Library development
This section provides information on how to develop within the perimeter of the library and it’s documentation.
If you are willing to contribute the actual development of the library, please consider reading our coding guidelines and contact us through the website.
Install a development version
Install the required dependencies
See External dependencies for the system requirements.
Download openturns
You can retrieve the development master branch through the git repository by issuing the following commands:
git clone https://github.com/openturns/openturns.git
cd openturns
Or, you can pick up a stable version:
git clone -b v1.22 https://github.com/openturns/openturns.git
cd openturns
Build openturns
CMake presets can be used on Linux, which sets debug build mode, warning flags, build dir, install prefix, etc:
cmake --preset=linux-debug
cmake --build build --target install --parallel 4
Run tests
Python tests can be run once the bindings are finished compiled:
ctest --preset=python
C++ tests must be built prior to be launched:
cmake --build build --target tests --parallel 4
ctest --preset=cpp
and all the tests should be successful else check the log file Testing/Temporary/LastTest.log.
Adding a single class to an existing directory
This how-to explains the process that must be followed to fully integrate a new class that provides an end-user facility (e.g. a new distribution). We suppose that this class will take place in an existing directory of the sources directories.
First, add the class to the C++ library
Create
openturns/MyClass.hxxandMyClass.cxxin appropriate subdirectories of lib/src. The files must have the standard header comment, with a brief description of the class and the standard reference to the LGPL license.For the header file
MyClass.hxx, the interface must be embraced between the preprocessing clauses:#ifndef OPENTURNS_MYCLASS_HXX #define OPENTURNS_MYCLASS_HXX BEGIN_NAMESPACE_OPENTURNS class OT_API MyClass { CLASSNAME; public: // default constructor MyClass(); ... }; END_NAMESPACE_OPENTURNS #endif // OPENTURNS_MYCLASS_HXX
to prevent from multiple inclusions.
See any pair of .hxx/.cxx files in the current directory and the PGQL document for the coding rules: case convention for the static methods, the methods and the attributes, trailing underscore for the attribute names for naming a few.
Modify the
CMakeLists.txtfile in the directory containingMyClass.hxxandMyClass.cxx:add
MyClass.hxxto the headers usingot_install_header_file ( MyClass.hxx ).add
MyClass.cxxto the sources usingot_add_source_file ( MyClass.cxx ).
Add
MyClass.hxxto the fileOTXXXXXX.hxx, whereXXXXXXis the name of the current directory.Create a test file
t_MyClass_std.cxxin the directory lib/test. This test file must use the standard functionalities of the class MyClass. Keep in mind there are over a thousand unit tests, so they should be reasonably quick to run, lasting preferably less than 10 seconds.Create an expected output file
t_MyClass_std.expoutthat contains a verbatim copy of the expected output (copy-paste the validated output of the test in this file).Modify the
CMakeLists.txtfile in lib/test: addot_check_test ( MyClass_std )in this file.If the validation of your class involved advanced mathematics, or was a significant work using other tools, you can add this validation in the validation/src directory.
copy all of your files in the validation/src directory.
modify the validation/src/CMakeLists.txt file by appending the list of your files to the list of files to install.
You may want to update the Changelog file to mention new classes, bug fixes…
That’s it! Your class is integrated to the library and will be checked for non-regression in all the subsequent versions of OpenTURNS, assuming that your contribution has been incorporated in the “official” release. But nobody can use it!
Second, add your class to the Python interface
Create MyClass.i in the python/src directory. In most situations, it should be:
// SWIG file MyClass.i

%{
#include "openturns/MyClass.hxx"
%}

%include MyClass_doc.i

%include openturns/MyClass.hxx
namespace OT {
%extend MyClass {

MyClass(const MyClass & other)
{
return new OT::MyClass(other);
}

} // MyClass
} // OT
Create MyClass_doc.i.in docstring documentation in the python/src directory. This will be part of the HTML documentation generated by sphinx. Document every method of your class that’s not inherited. In most situations, it should look like this:
%feature("docstring") OT::MyClass
"MyClass class.

Available constructors:
    MyClass()

    MyClass(*designPoint, limitStateVariable, isInFailureSpace*)

Notes
-----
Structure created by the method run() of a :class:`~openturns.Analytical`
and obtained thanks to the method *getAnalyticalResult*.

Parameters
----------
designPoint : float sequence
    Design point in the standard space resulting from the optimization
    algorithm.
limitStateVariable : :class:`~openturns.RandomVector`
    Event of which the probability is calculated.
isInFailureSpace : bool
    Indicates whether the origin of the standard space is in the failure space.

Examples
--------
>>> import openturns as ot
>>> ot.RandomGenerator.SetSeed(0)
>>> dp = ot.Normal().getRealization()
>>> inst = ot.MyClass(dp, 4.8)
>>> print(inst)
>>> 4.5677..."

// ---------------------------------------------------------------------

%feature("docstring") OT::MyClass::foo_method
"...
"
Beware that docstring tests run from the Examples section share the same environment and they can be affected by global settings such as RandomGenerator seed or ResourceMap entries, so for example here we reset the RNG seed prior to sampling to avoid affecting the expected result. Also, these examples must be very quick because they are run as batches per module, more expensive tests can be run in the dedicated unit tests.
Modify the CMakeLists.txt file in python/src: add MyClass.i, MyClass_doc.i.in to the relevant
ot_add_python_moduleclause.Locate and modify the file yyyy.i, where yyyy is the name of the python module related to MyClass, to include MyClass.i in the correct set of .i files (see the comments in yyyy.i file). In order to identify the correct python module, remember that the modules map quite closely the source tree organization.
Create a test file
t_MyClass_std.pyin the directory python/test. This test implements the same tests thant_MyClass_std.cxx, but using python. Keep in mind there are over a thousand unit tests, so they should be reasonably quick to run, lasting preferably less than 10 seconds.Modify the CMakeLists.txt file in python/test:
add
t_MyClass_std.pyto the tests usingot_pyinstallcheck_test ( MyClass_std ).
Document your contribution more thoroughly
If your class introduces important mathematical concepts or impacts the library architecture it may be useful to add some more details in the documentation, see Sphinx documentation.
That’s all, folks!
Some timings from an Guru: 2 days of work for the most trivial contribution (a copy-paste of a class with 5 methods, no mathematical or algorithmic tricks). For a well-trained contributor, a user-visible class with a dozen of methods and well-understood algorithms, a new class should not be less than a week of work…
Adding a set of classes in a new subdirectory
This how-to explains the process that must be followed to fully integrate a set of classes that provides an end-user facility (e.g. a new simulation algorithm) developed in a new subdirectory of the existing sources. The task is very similar to the steps described in the how-to, only the new steps will be described. We suppose that the subdirectory has already been created, as well as the several source files. There are three new steps in addition to those of the how-to: the creation of the cmake infrastructure in the new subdirectory, the modification of the infrastructure in the parent directory and the modification of the infrastructure in the root directory.
CMake infrastructure in the parent subdirectory
You have to set up the recursive call of Makefiles from a parent directory to its subdirectories, and to aggregate the libraries related to the subdirectories into the library associated to the parent directory:
add NewDir subdirectory to the build:
add_subdirectory (NewDir)
CMake infrastructure in the new subdirectory
You have to create a CMakeLists.txt file. Its general structure is given by the following template:
#                                               -*- cmake -*-
#
#  CMakeLists.txt
#
#  Copyright 2005-2026 Airbus-EDF-IMACS-ONERA-Phimeca
#
#  This library is free software: you can redistribute it and/or modify
#  it under the terms of the GNU Lesser General Public License as published by
#  the Free Software Foundation, either version 3 of the License, or
#  (at your option) any later version.
#
#  This library is distributed in the hope that it will be useful,
#  but WITHOUT ANY WARRANTY; without even the implied warranty of
#  MERCHANTABILITY or FITNESS FOR A PARTICULAR PURPOSE.  See the
#  GNU Lesser General Public License for more details.
#
#  You should have received a copy of the GNU Lesser General Public License
#  along with this library.  If not, see <http://www.gnu.org/licenses/>.
#

# Register current directory files
ot_add_current_dir_to_include_dirs ()

ot_add_source_file (FirstFile.cxx)
# ...
ot_add_source_file (LastFile.cxx)

ot_install_header_file (FirstFile.hxx)
# ...
ot_install_header_file (LastFile.hxx)

# Recurse in subdirectories
add_subdirectory (FirstDir)
# ...
add_subdirectory (LastDir)
Version control
The versioning system used for the development of the whole platform is Git.
The git repositories are hosted at Gihub where sources can be browsed.
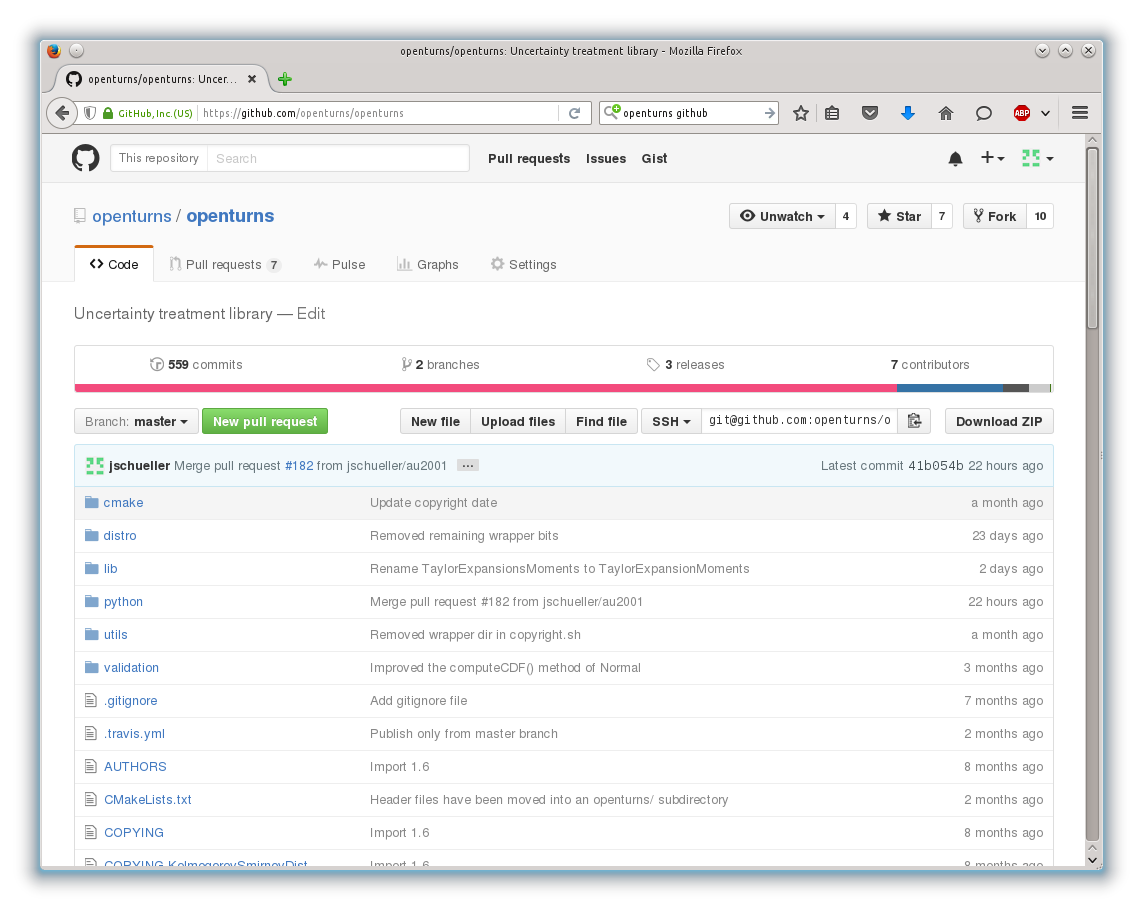
Bug tracking
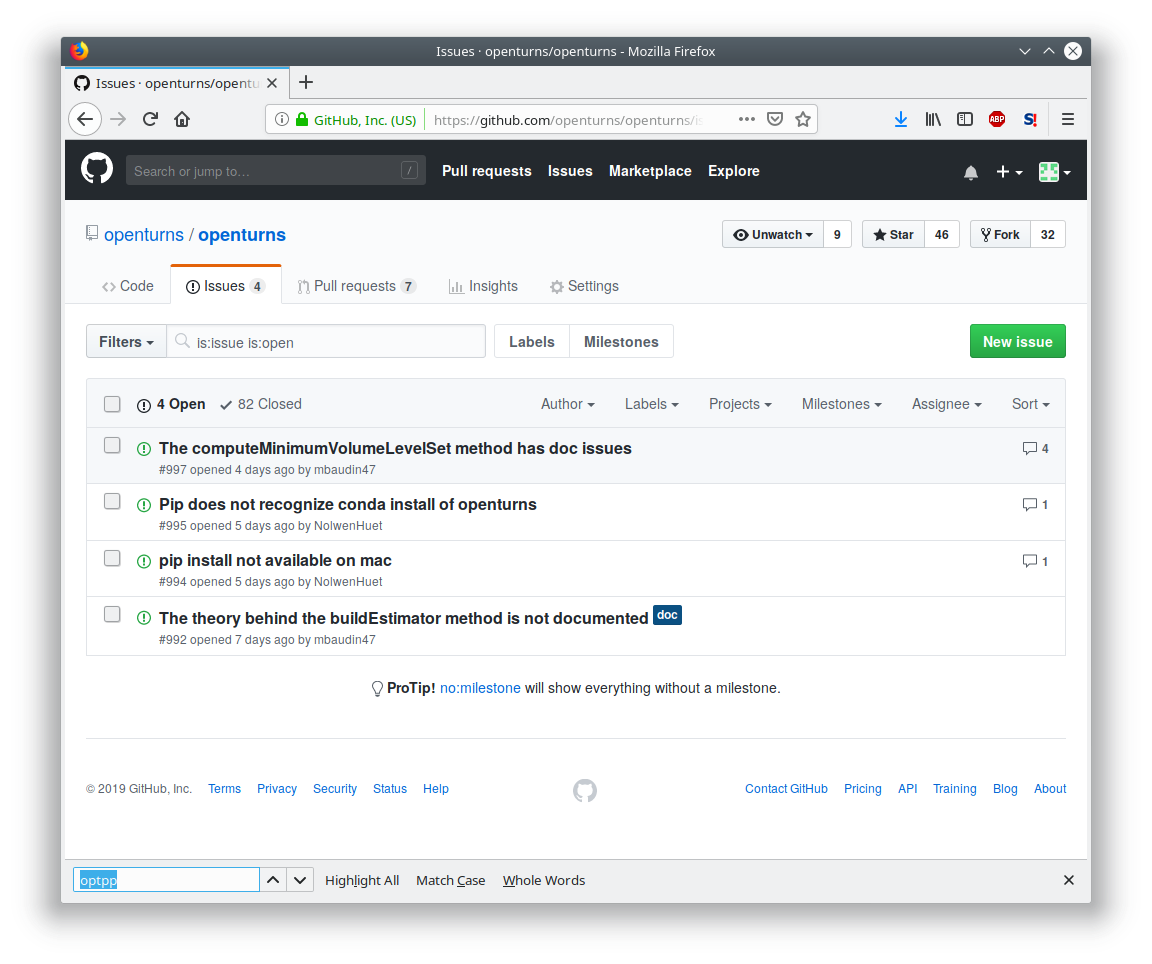
GitHub’s tracker is called Issues, and has its own section in every repository.
The snapshot of the library bug-tracker shows the list of active tickets:
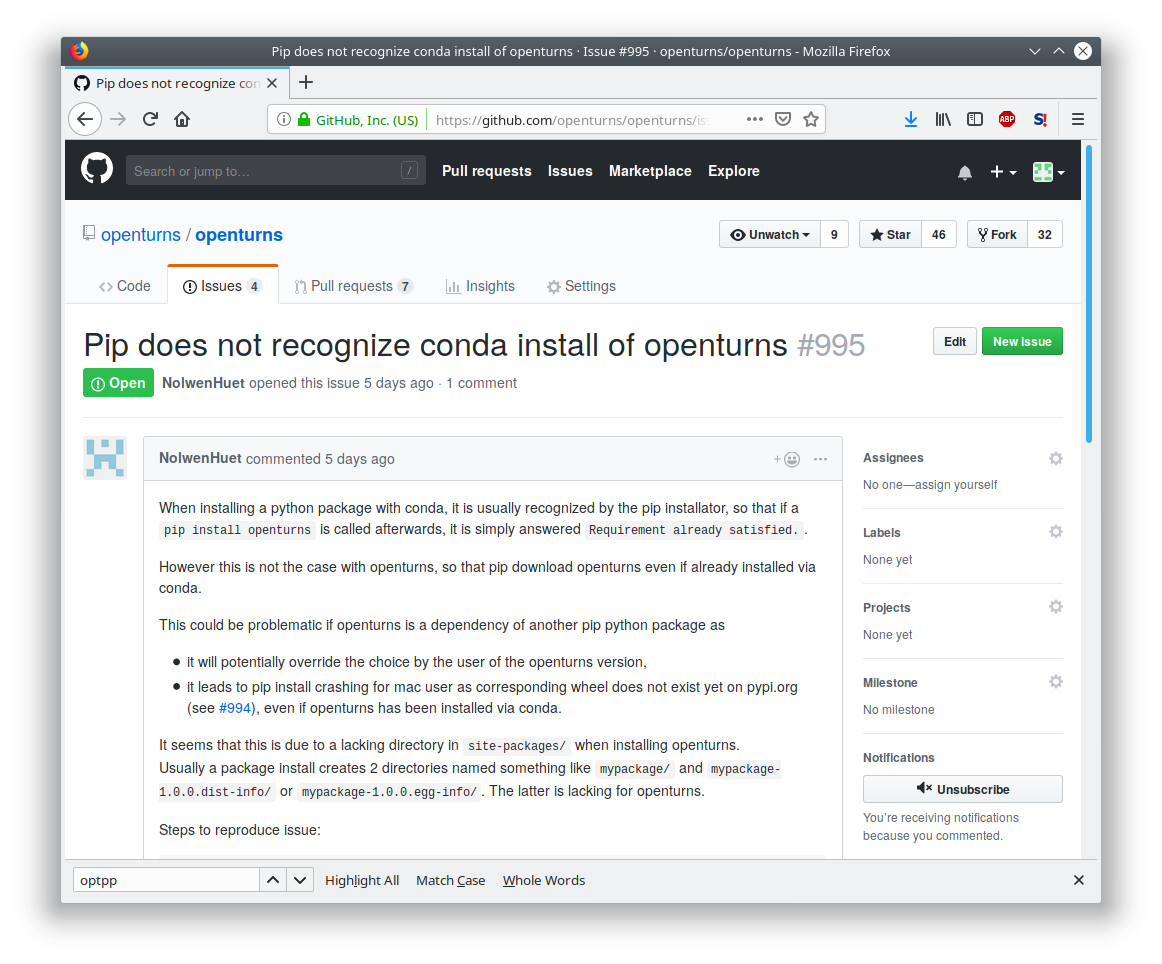
Each ticket features attributes to help classification, interactive comments and file attachment. This snapshot exposes the details of a ticket:
Other requirements
Namespace
All the classes of the library are accessible within a single namespace named OT and aliased as OpenTURNS. It allows one to insulate these classes from classes from another project that could share the same name. Macros are provided to enclose your code in the namespace as follow:
BEGIN_NAMESPACE_OPENTURNS
// code
END_NAMESPACE_OPENTURNS
Internationalization
The platform is meant to be widely distributed within the scientific community revolving around probability and statistics, which is essentially an international community. Therefore, the platform should be designed so as to be adjustable to the users, particularly those who do not speak English [1].
This involves not using any messages directly in the source code of the platform, but rather to create a resource catalogue that can be loaded, according to the locale setting of the user, when the application is launched.
Another consequence of internationalization is the need for the Unicode extended character set to be used for all strings.
Accessibility
The platform shall be accessible to disabled users. This has implications on the ergonomics and the design of the User Interface, particularly the GUI which should offer keyboard shortcuts for any available function as well as keyboard-based (rather than mouse-based) mechanisms to handle and select objects.
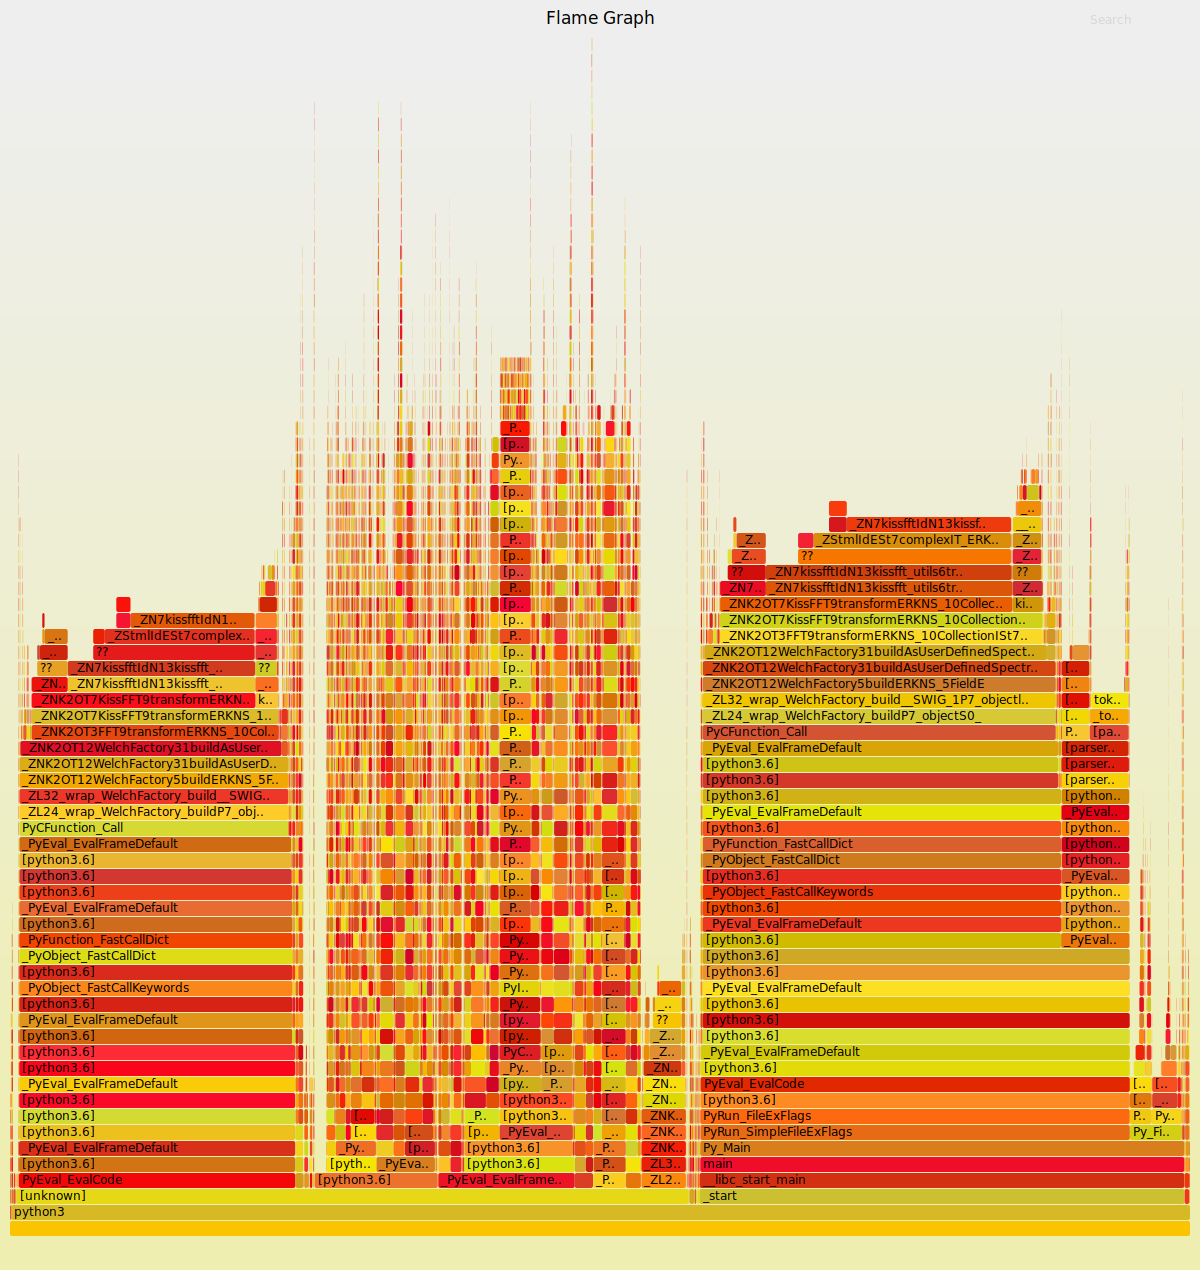
Profiling
Flame Graphs can help visualize where your functions spends the most time. Here are some commands to profile your code paths using the perf tool and generate the associated graph with FlameGraph.
First retrieve the graphing scripts:
git clone https://github.com/brendangregg/FlameGraph.git /tmp/FlameGraph
You will need to build without parallelization and with debug flags:
cmake -DUSE_TBB=OFF -DCMAKE_BUILD_TYPE=RelWithDebInfo -DCMAKE_CXX_FLAGS="-fno-omit-frame-pointer" .
You will also want to disable openblas threads or openmp at any other level:
export OMP_NUM_THREADS=1
Now you are ready to profile your executable:
perf record --call-graph dwarf -o /tmp/perf.data ./lib/test/t_WelchFactory_std
Some Linux distros prevent normal users from collecting stats, in that case:
echo "-1" | sudo tee /proc/sys/kernel/perf_event_paranoid
echo "0" | sudo tee /proc/sys/kernel/kptr_restrict
At this point you should be able to generate the graph from the perf data:
perf script -i /tmp/perf.data | /tmp/FlameGraph/stackcollapse-perf.pl | /tmp/FlameGraph/flamegraph.pl > /tmp/perf.svg